EEG: Running an Experiment (COVID-19 Adjusted)
Collecting EEG data that is clean and optimal can be a bit of an art form. Below is a list of all the steps that are involved in setting up a participant to complete the EEG protocol; however, even while the participant is running through the experiment you must remain vigilant regarding the quality of the data, and minimize the impact of noise, or artifacts that can impact the EEG. Detecting and eliminating artifacts is a skill that will come with practice. See Helpful Hints below for troubleshooting when you see artifacts appear during data collection. Finally, it is recommended that you develop a “spiel” for guiding the participant through the setup procedures. It can be an uncomfortable experience if the participant doesn’t know what to expect; therefore, explaining to them what each step involves before starting will help them to feel at ease with the procedures.
- While a participant is filling out the consent form or other study documents, it is recommended that you use this time to prepare for EEG setup. Before starting, wash your hands for 20 seconds and put your mask on. If the participant’s head measurements have already been recorded, begin attaching electrodes to the cap, making sure that the electrodes are in the proper slots. They are designated by color and number. Prepare your electrode application area outside of testing room 2 by putting the participant’s chair in the middle of the area and placing a towel on top of the bookshelf for your application equipment to lay on. If needed, setup the desk in the recording booth with the keyboard and mouse pad on top of it. Fill two syringes with electrode gel and cap them with blunt needle tips. Alongside the filled syringes and gel container, make sure that your stickers, alcohol prep pad, cotton swab, tissues and measuring tape are available. Thoroughly wipe down any surface that you and the participant will come in contact with during the experimental procedures (i.e. chairs, door handles, key board, etc.) using a lysol disinfectant wipe.
- Locate your face shield and put it over your mask before proceeding with the participant. Become aware of social distancing, and try your best to distance at least 2 m away from the subject throughout the remainder of the session.
- After the person has signed consent, ask them to remove any jewelry or hair ties that may block the connection between EEG sensors in the cap and the participant’s scalp. Remind the participant to properly keep their mask on at all times until told to otherwise.
- If the participant’s head measurements have not yet been recorded, use the centimeter side of the measuring tape and measure the circumference of the participant’s head. Remember to disinfect before use.
- Select the EEG cap that corresponds to the participant’s head circumference, noting that it’s better for the cap to be slightly tight than slightly loose. If you select a tight cap, check with the participant to make sure that they are comfortable.
- Assist the participant with putting the cap on the head, having them hold the front of the cap in place while you pull it over the back of their head. After they have secured the chin straps, center the cap by eye.
- After the cap is approximately centered, you must measure it to make sure that it actually is. Using the centimeter side of the measuring tape, measure from the bridge of the nose to the indent of the back of the head on top of the neck. Electrode holder #24 should be in the center of these two points.
- Next, measure from earlobe to earlobe. Electrode holder #24 should again be in the center of these two points.
- If you haven’t yet, go ahead and start attaching the electrodes on the cap and in the designated slots. Since you may need some force to slip the electrodes in, let the participant know that they may feel some pressure on their head, but that it’s completely painless.
- You will usually put 4 electrodes on the participant’s face (3 for CNTRACS). These electrodes are flat; they do not have a protruding sensor for inserting into holders on the EEG cap. Before connecting these electrodes to the face, first clean the area gently by using an alcohol prep pad on the four locations: two electrodes should be placed on the outer canthi of the eyes (one right, one left); one electrode should be placed on the tip of the nose; and one electrode should be placed below the left eye. To connect these to the face, use the double-sided donut adhesive stickers. The stickers should be positioned such that (1) the silver disc on the bottom of the electrode can make contact with the skin, and (2) the hole in the sticker includes the gap on the electrode—this is so that you can use a syringe to fill the space between the electrode and skin with gel (see Step #11). Use the chart in the lab to determine which electrodes go where.
- There should be two remaining flat electrodes. These need to be placed on the mastoid bones (the bone protrusions sticking out behind the ear). These electrodes must be placed so that the silver disc on the electrode is directly on top of the bone; misplacement of these electrodes will result in electrical noise from the carotid artery and will impact the quality of data recording.
- Using the electrode gel-filled syringes that you prepared in Step #1, begin injecting electrode gel into the gap in between the scalp and the recording electrode. You should begin with the black ground electrode every time. It can be helpful to first use the blunt needle tip to find the participant’s scalp, swirl it once to clear hair out of the way, and then inject the gel as you withdraw the needle. The result should be a thin column that creates a bridge between the scalp and the electrode. Do not overfill these! Try to use as little gel as possible to accomplish this task.
- Instruct the participant to slowly stand up and lead you into the testing room. Tell them to enter the testing chamber and to carefully sit down on the chair. Make sure a fully-charged battery is plugged into the head box on the cart behind you. Take the ribbon(s) and the ground electrode and connect them to the battery.
- To measure the signal quality of the gel you inserted in the electrodes, do the following steps: (1) make sure a fully-charged battery is plugged into the head box; (2) Open Recorder on the acquisition computer (the one on the left); (3) Click the “Impedance Check” button with a cylinder shape on it in the upper left hand corner of the screen—little LED lights in the electrodes should start blinking; (4) Change the first impedance scale value to 50 and the second one to 100. You should now be able to see 64 squares (34 squares for CNTRACS) that are mostly or all red—each of these refers to an electrode’s impedance. They will turn green as the connection improves; (5) in order to see the impedance values in the chamber while you are injecting the gel, use the black box underneath the dual-monitor setup to select Screen 1—this will show you the acquisition computer’s screen in the chamber through the setup procedures.
- Once all the LED lights have turned green, click on the “Monitor” button in Recorder to the left of the impedance check button. This will show the participant his/her EEG as it is being obtained in real time! I like to use this time to show them how the EEG looks when they tense, grind their teeth, yawn, talk, etc. Give them a moment to play with their EEG.
- Open up the experiment on the stimulus presentation. At this time, you should use the black box underneath the dual-monitor setup to select Screen 2—this will show the participant the screen on which the stimuli will appear during the experiment.
- Run the participant through the demonstration and practice. Tell the participant that they can carefully slide their mask down once the door has been closed and they’re alone in the booth. If text instructions appear on screen, read the text out loud to them through the microphone and clarify if necessary.
- After the practice and before the experiment begins, click “Record” in Recorder on the acquisition computer and save the data file using the Subject ID number in the appropriate study folder. It is very important that you use the same file naming convention across all subjects within a study.
- Once the recording has started, you may advance the experiment for the participant!
- As stated above, this is not the time to walk away from the recording. Rather, you will need to watch the EEG as it is being obtained and offering breaks and suggestions to the participant if you notice that the data are becoming noisy. Depending on the study, you will also need to make notes on the iPad while the participant is running through each task, like writing down the start and end times or making note of any interruptions (i.e. participant fell asleep). Some helpful hints for this process are listed below.
- After the experiment is over, disconnect the ribbons and gently pull the cap (electrodes and all) off of the participant’s head. Give them the shower kit and show them to the bathrooms where they can rinse their hair. While participants are in the bathroom, use this time to prepare their payment forms and tidy the space: wipe down all surfaces that have electrode gel on them, throw away the syringes, place the blunt needle tips in the sharps container, and return the battery to the charging station.
- After the participant has been paid and has left, take the electrode cap and toothbrush to the bathroom where you will gently pull each electrode out and scrub the electrode gel off of it gently with the toothbrush. Once all of the electrodes are free from gel, rinse the cap as well. IMPORTANTLY, while it is okay to get the electrodes wet, the rest of the ribbon must remain dry.
- Both the cap and electrodes need to be sanitized. On the bottom shelf of the EEG cart, there is a Tupperware with sanitizer in it. Soak the cap in it for one minute, and then rinse; also soak the electrodes in the sanitizer for one minute and then rinse. It is okay to submerge the electrodes, but keep the rest of the ribbon away from any liquid.
- Once the cap and electrodes have been rinsed a second time, return them to their proper spots to dry. Make sure that if any electrode holders have come loose on the cap, that they have been replaced.
- Thoroughly sanitize any surface that you and the participant were exposed to using Lysol disinfectant wipes. These surfaces include any experimental equipment, chairs, keyboards, mouses and door handles in the testing room and testing booth, the bathroom, including the bathroom sink and toiletries, the sink and surface of the area where you cleaned the electrodes and cap, and the bookshelf where you placed your electrode application equipment.
- Take one final look around the chamber to make sure that everything has been returned to its rightful place. If you notice any supplies are getting low, make sure to let Laura and/or Dr. Erickson know that more supplies need to be ordered.
- Plug the battery and iPad back in after carefully sanitizing them!
Helpful Hints:
- As suggested in Step #15, you should let the participant play with their EEG. This is not only fun for the participant (how often do you get to see your own brain in action?), but it will also help them understand what you need from them when you ask them to remain still throughout the experiment. I often give them some instructions, like “blink,” or “clench your jaw,” or “tense your shoulders,” and then let them watch what it does to the EEG. I will then say something like, “see that mess on the screen? All that stuff is covering up the brain activity that we really want to measure. Now, relax your face and shoulders as much as you can.” Wait for the EEG to settle down. “See how nice and flat that is? That’s what we’re hoping to see through the whole experiment. So I’ll be sitting out there watching the EEG, and if it starts looking a little messy I’ll just remind you to relax.” By doing this, you are prompting the participant to understand that you are both on the same team, trying to get the cleanest data possible.
- You will not be able to check the impedance during the experiment. However, you will likely have to start and stop the recording more than once during data acquisition so that the EEG files are not too large. At this time, feel free to check impedances and add electrode gel to any electrodes that have lost connection over the course of the experiment.
- While the data are recording, it is perfectly okay to flip back and forth between the first 32 electrodes and the last 32 electrodes, using the dropdown menu on the right side of the Recorder screen. Do this periodically throughout the experiment so that you don’t miss one electrode going out of range. If you notice this happening during the experiment, it is critical to fix it as quickly as possible. If you cannot pause the experiment, simply re-fill that electrode with gel as unobtrusively as possible while the experiment is still running. It’s better to have to throw out just a few trials while you are fixing that electrode than record an entire session with an electrode that is poorly connected.
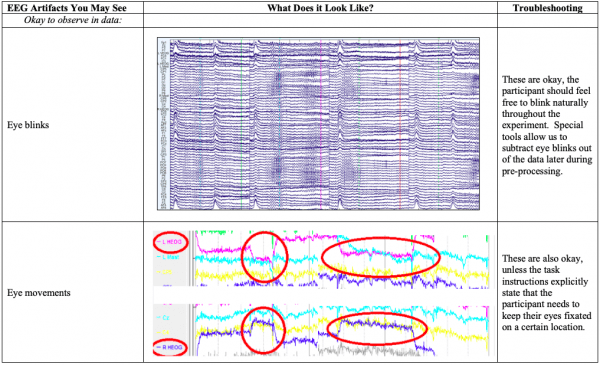
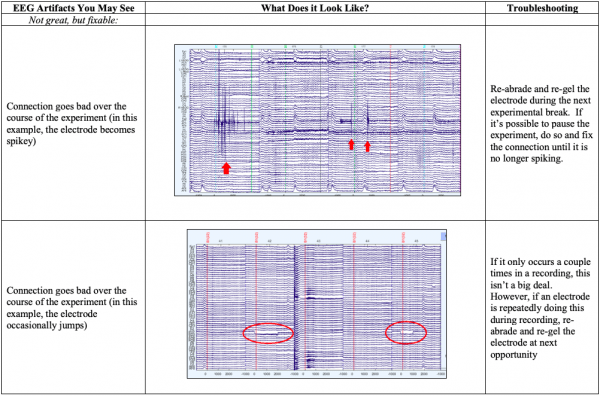
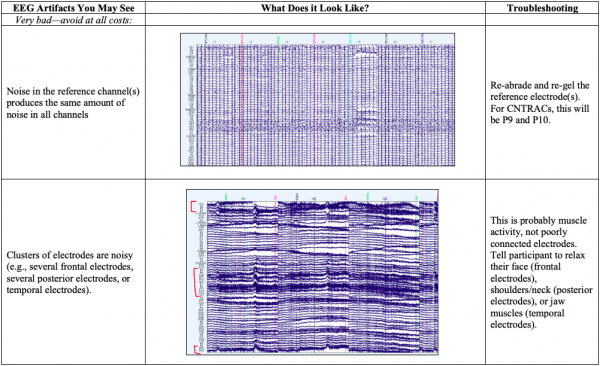
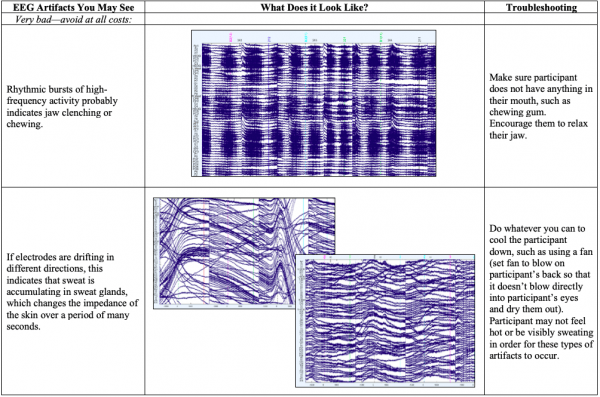
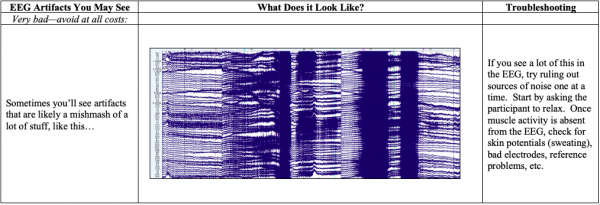
- Below you’ll see diagrams of some of the most common types of artifacts, or sources of noise within the EEG: