
Experimental Procedures: Finishing a Session
After the participant is finished with the experimental session, there are a few things to take care of. Please make sure to do all of these things after each session!
Wrapping up with the participant
Paying the participant:
Locate the petty cash receipt in the lock box and complete all the blank fields as necessary, making sure to write down all of the information yourself (i.e., do not allow participant to fill out address and social security number). Indicate how much money they have earned; pay rate is $15 per hour, rounded to the nearest half-hour and up to the nearest dollar. So, one hour = $15, and 1.5 hours = $23 ($15 + $7.50 rounded up = $23), etc. Although most studies use this $15 per hour pay scale, occasionally studies use a different pay scale. Refer to the “Study Account Info” document in the Erickson Lab → 05_Administratve → SOPs folder for study-specific pay scales.” In the case that we provide a participant with transportation, separately indicate how much money they will be recompensated. Please note that we only cover up to $50.00 each way ($100.00 maximum coverage for transportation costs both ways) and the participant will be responsible for any additional expenses. After the participant has signed his/her name, give them the appropriate amount of cash from the envelope. Return the filled-out receipt back into the lock box.
Scheduling next appointment:
Most of the studies include multiple testing sessions for each participant. At the end of each session, schedule the next one before the participant leaves. Open up the lab calendar and the screening/scheduling GUI tool. Click on the “Schedule Next Session” button and fill out all information after you decide on the next appointment time and date, depending upon experimenter and participant availability. After finalizing their appointment date, time, and mode of transportation, let the participant know that they will be receiving a reminder one day before their scheduled appointment.
Transfer to next study:
If the participant has completed all components of a given study and qualifies for participation in another study, let them know about other opportunities for research participation. If they are interested, you can schedule them for the next study at the end of their last appointment.
Wrapping up after the participant has left
Upload data to response forms and delete data from iPad:
After the participant has left, you will need to upload their self-report and interview data that you gathered during their experimental session into their indicated folders on the Z-drive:
- First, password protect the participant’s consent form with the lab’s general password and save the file as “[year]_[month]_[day]_[initials].pdf” (if John Smith did the CNTRACS study on May 23rd 2020, his consent form would be saved as 2020_05_23_JS.pdf.).
- Navigate to the Z-drive and locate the “Consent” folder to upload the consent form.
- Next, locate the relevant study folder. Inside, there are two separate sub-folders: (a) behavioral data, and (b) self-report and interview data.
- Create an individual subject folder inside the self-report and interview data folder and move over all of the participant’s assessments from the iPad into their folder.
- Finally, go back into the iPad and delete the participant’s consent form and all of their assessments.
- NOTE: Before deleting anything on the iPad, please double-check that all uploaded documents properly saved on the Z-drive.
If when obtaining the participant’s consent, you noticed that the consent form pile was running low, please make sure to notify Laura or one of the RA’s to print out more hard copies.
Updating a participant’s record:
To keep a record of which tasks a participant has completed in a study protocol, you will need to use the screening/scheduling GUI to update the participant’s task list record after every testing session. First click on the “Update Participant Record” button in the GUI, then select the (a) study and (b) participant that needs to be updated. Fill out all fields on the left column, making sure to change the participant’s status from “Scheduled” to “Active” once s/he has completed at least one session.
The right-hand column will include a list of all of the study tasks and assessments. Indicate the date that those tasks and assessments were completed. Occasionally, one or more of the study tasks and assessments will have been completed as part of another study. For example, a participant does not need to complete a SCID more than once each year; if s/he completed a SCID six months ago as part of another study, we will not re-do the SCID for the present study; rather, we will use the text field to the right of the date field to indicate the study that the SCID was drawn from. Most of the time, all assessments will be unique to that study, so the study name is auto-filled in those text boxes for ease of record-keeping.
Finally, enter any notes specific to the study in the notes field. For example, perhaps the participant was temporarily lost to follow up for a couple months, but eventually completed all study procedures; you would write in the notes field that there was an abnormally long delay between testing sessions. Any notes that are specific to a subject should go into the notes field in the subject information database (e.g., the participant frequently no-shows his/her appointments).
When the participant is no longer active in a study, either because they have completed all study procedures, have been lost to follow-up, have involuntarily withdrawn, etc., make sure to change their study status to reflect this change. This will “close” the participant, and their number will no longer appear in the dropdown menu for record updating.
Adding a tack-on task:
Occasionally, short experiments that are adequately covered by a larger study’s IRB protocol will get “tacked on” to the end of a study session. If a participant is able to complete one of these tack-on tasks at the end of an experimental session, make sure to document this by clicking the “Tack On Task” button in the GUI. From there, you first select the participant’s E-number, then the study they were originally enrolled in (the IRB number will auto-populate, but check to make sure it’s correct), then select the tack-on task they completed. As with the Update Record panel, complete all fields. Most of the data should auto-populate from the original data record. Make sure to state clearly which assessments and tasks were “grandfathered in” from the original study, and which assessments and tasks were unique to the tack-on experiment using the text field in the right-hand column.
Updating the petty cash log excel spreadsheet:
You will have to record the petty cash transaction on the petty cash log excel spreadsheet located on the Z-drive (05_Administrative → Finance). Note that the petty cash log is password protected with the lab’s general password. Indicated below is a sample of what logging an expense will look like using the exact spreadsheet
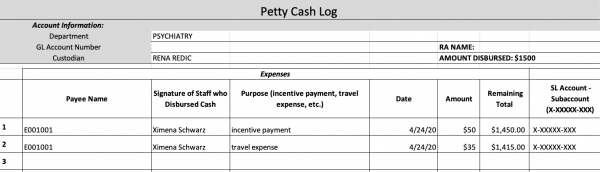
As depicted in the above sample, two entries were recorded for participant E001001 with two different expenses. If a participant is also reimbursed for any transportation costs, it’s important to separately indicate this expense under the incentive payment that all participants receive after a session. Otherwise, the incentive payment should be recorded as a single entry. In the “Remaining Total” column, notice that for each entry, the total balance decreases depending on the sum of the current expense amount subtracted from the last recorded remaining total amount (the last entry amount of $1,450.00 – the cab fare expense of $35.00 = the current available remaining amount of $1,415.00). Your job for each entry is to make this exact calculation to indicate how much money is currently available in the account being charged for participant expenses. It’s also important to know what the remaining total balance is in order to disburse more money into an account that’s running low on funds. Next to the remaining total is the “SI Account – Subaccount” column. Please refer to the “Study Account Info” document in the SOP’s folder to locate the related account numbers for each study.
Clean up after yourself!
With so many people using such a small lab space, it’s important to make sure to clean up thoroughly after each experiment:
- If you used the EEG system, make sure all the backs of stickers are thrown away, the electrodes washed, needle/syringes properly disposed of, the top of the cart is clear from clutter, and the battery is charging.
- Log out of all computers
- Put away money/vouchers in lock box
- Take all of your belongings with you
- Avoid leaving any scratch paper and pens out
- Use a Lysol wipe to scrub any electrode gel off of surfaces, and use the stick vacuum cleaner to get dried electrode gel off of the floor
- Tidy up the bathroom; check to make sure there are no smudges on the mirror or hair in the sink. Make sure the supply tower in the bathroom is well-stocked.
- IMPORTANT COVID-19: It’s crucial to thoroughly wipe down ANY surface that you and the participant were exposed to with Lysol wipes. These surfaces can include chairs, door handles, bathroom sink, toiletries, key board, mouse pad, etc. You must properly wear your mask during the entire time you are disinfecting the exposed lab space.
Also, if you used the last of any supplies (or noticed that we’re running low on some supplies), please leave a note for Laura so that she can order more.
NOTE: Every other month, there’s a scheduled run-through of the lab’s study supplies list. RA’s are responsible for completing the supply checklist on the scheduled day and for alerting the lab coordinator if an item needs to be replenished. Please refer to the “Bi-Monthly Supply and Maintenance Checklist” document on the Z-drive for specific instructions (Administrative → SOP’s).
