
Volunteer Research Assistants
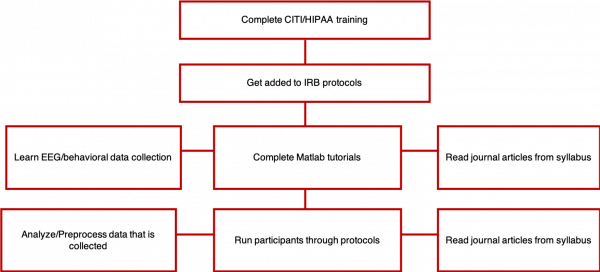
As a volunteer research assistant, you should have 10 hours of scheduled lab time each week for a minimum of three quarters. On average, these hours will break down into 6 hours of data collection, 3 hours of didactics (tutorials and reading), and 1 hour of lab meeting per week. You will be asked to develop skills in two important areas during your didactic hours: (1) computer programming (for data analysis), and (2) critical review of the literature. Below you will see a flow chart that outlines the general order of the steps needed to achieve independence as a volunteer research assistant. After you have been fully trained, you will split your time between running research participants, analyzing data, and reading journal articles.
You will be given your own folder on the server, where you can store work-related documents. Your personal folder will also include a subfolder for storing your ethics training certificates as well as a subfolder for storing your Matlab assignments. You are free to store any additional work-related information (e.g., interesting research articles, data figures, etc.) in your personal folder.
There are also some general expectations for professional conduct. You’re expected to arrive on time for your scheduled hours, and to have a method for contacting other lab members to cover for you if—for whatever reason—you are held up and not able to meet your research participant at the scheduled time. Professional demeanor with respect to interaction with colleagues and research participants is expected. The dress code for the MAPS Lab is what we call “common sense casual.” That is, jeans and an appropriate top are fine; please avoid wearing revealing clothing or comfort wear.
Finally, research participant confidentiality and responsible research practice is considered of utmost importance, which includes maintenance of confidentiality and secure data storage. An overview of these issues will be provided in your CITI/HIPAA training, and our lab-specific implementation of these practices will be covered while you shadow participant data collection. If you have questions or concerns about data handling or confidentiality, please feel free to contact Dr. Erickson directly.
On-Boarding
Before you can begin collecting data, you must first complete the on-boarding procedures listed below. Jeanette Pach, the department’s Human Resources Administrator, will be in contact with you during the process to help you with the required course-of-action.
- You will receive an e-mail from Jeanette containing a set of on-boarding paperwork. Fill-out all documents and e-mail them back to Jeanette immediately.
- After Jeanette processes your completed paperwork, you will schedule two Occmed (Occupational Medicine) appointments with her. The first appointment is to update any vaccinations that are required by the university to interact with a clinical human population. The second appointment is to retrieve your ID card that’s needed as a form of identification to work in the hospital.
- After your first Occmed appointment, and while you’re waiting for your second one, you can complete your CITI training which must be finished before you can be added to any protocols. If you have not yet created a CITI Program account, navigate to citiprogram.org and complete the necessary steps to sign yourself up. You will need to register for the following courses: (1) Human Research – Biomedical Faculty/Investigators, Research Staff, or Administration Staff and (2) the CITI Conflicts of Interest courses. If you have worked in a human subjects research lab before, you may have already completed some of these CITI training courses. Check with the lab coordinator to find out what trainings may count towards your CITI certification. Once you are done with both trainings, save a copy of both certificates to the following folder: Erickson Lab → 04_IRB → Certificates, and let the lab coordinator know that you have finished.
- After your second Occmed appointment, Jeanette will then grant you access to an Oracle account to complete your HIPAA training. This training should take you no more than 1 hour to finish.
In general, the entirety of the on-boarding process ranges from 3-4 weeks, and it’s important to strictly stay on top of the required steps to get you started faster. As soon as your Occmed appointments are done and your CITI and HIPPA Training is complete, the lab coordinator will add you to the IRB protocol. You will not be able to directly interact with research participants until you’ve been added to the protocol. While you wait for approval to run research participants, your time will be filled with other lab trainings, assigned readings and basic administrative tasks.
Miscellaneous Trainings
Matlab Training:
Matlab is a programming language that has many critical applications in research. Although it will be important for you to learn how to use it in this lab so that you can preprocess the data that you collect, you will find that Matlab is used in a wide variety of laboratories and disciplines. Many first-time users find the notion of learning a programming language daunting; however, the tutorials are designed for the novice programmer, and assistance is available if you get stuck.
The format of Matlab training in this lab is through the use of self-guided tutorials, which are all available on the Z-drive in the volunteer RA folder. You can go through the tutorials at your own pace, making sure to provide Dr. Erickson feedback regarding your comprehension of the information (you will be prompted to do this at the end of each tutorial). If you get stuck in any of the tutorial exercises, you are encouraged to work with other research assistants in the lab to find a solution (this, after all, is the best way to learn!).
Experiment Training:
Before you can start running participants in experiments, you will need to also be added to the IRB protocol, which cannot happen until you complete your CITI and HIPAA training. Again, make sure to get these steps done as soon as possible!
After an IRB amendment has been submitted to add you to the experiment protocol, and while you wait for Z-drive access, you will begin shadowing a research assistant through data collection procedures. There are several steps to completing any given protocol, including:
-
- Scheduling participants and using the lab calendars
- Arranging for transportation
- Obtaining informed consent
- Collecting data
- Paying the participant
- Logging relevant information in the lab GUI
After you have shadowed 2-3 participants from beginning to end, an observer will watch you complete data collection for 2-5 participants, depending on the complexity of the experiment and need for additional training. The observer will provide you with feedback and support until you are ready to complete data collection procedures by yourself.
Additional Reading:
There are three introductory articles stored in the volunteer RA folder on the Z-drive. Read these at your leisure during your first three weeks while you get your privileges set up and begin shadowing data collection. When lab meeting begins for the new quarter, you will be sent journal articles at regular intervals, which you will also be asked to read ahead of lab meeting.
Navigating Through the Z-drive
While working in the MAPS Lab, you will be given access to the Z-drive, which is a shared storage folder that can be accessed from any laboratory computer. The Z-drive contains folders from many different laboratories. For our purposes, we only use the Erickson Lab folder, which will contain a number of the tools you will need as a research assistant in the lab.
Begin by making sure that you can locate the Erickson Lab folder and create a shortcut to that folder on your desktop for easy access. Navigate to File Explorer on your computer and find the Z-drive on the bottom left-hand corner. It will appear as: psy [//bsdshares.uchad.uchospitals.edu] (Z/). Double click on this server then open the “Groups” folder. Scroll down until you find the “Erickson Lab” folder. Right click and select “Send to” → “Desktop (create shortcut).” You will now have a shortcut to the Erickson Lab folder on your local desktop for easy access.
Over the course of your time in the MAPS Lab, you will become familiar with the folder structure. Very briefly, you’ll notice that ongoing studies have their own data folder; there is a folder for IRB documentation; and most study staff have their own folder to temporarily store files for their own use. This is also where you will find all Matlab tutorials. You’re free to put anything you would like in your own personal folder and to manage that content however you wish. However, refrain from saving things into other folders or deleting items from other folders unless you have been directed to do so. As you read through the next section of the document (Experimental Procedures) you’ll find more detailed instructions on how to locate specific subfolders and files within the Z-drive.
NOTE: Before moving on, please take the time to thoroughly go over each section of the overview. Once you’ve understood the basic outline of your role as an RA, and you have completed the on-boarding procedures, refer back to the “MAPS Lab Manuals” on the website and navigate to “Experimental Procedures.” From recruiting a participant, to wrapping-up an experimental session, this page will serve you as a step-by-step guide for conducting a complete experimental session with a study subject.
