
Experimental Procedures: Recruitment & Scheduling
Before making a phone call to schedule or recruit a participant, make sure to have the GUI screening/scheduling tool and lab calendar open (log in to the lab’s g-mail account using the lab’s e-mail; refer to the “SOPs” folder (Erickson Lab → 05_Administrative → SOPs) and open the “Lab Accounts Info” document for more details.
Recruitment: responding to an e-mail from a potential participant
You will need to schedule a time to speak on the phone so that you can ask the participant some screening questions. E-mail the person back using the following script:
Recruitment: Research Match
If the participant was recruited through Research Match, log in to Research Match (researchmatch.org) using the lab email address and password. Click on the indicated study, locate the Enrollment Continuum and look up the new participant’s contact info to retrieve their e-mail. E-mail the potential participant using the following script:
“Hello ________,
You’re being contacted because you indicated interest in participating in our study at the MAPS Lab of the University of Chicago on researchmatch.org. Thank you for your interest!
I’d be happy to provide you with more information about our study. But before we can get you scheduled for the study, we will have to go through a phone screen process to further determine if our study is a good match for you. This discussion and screening should take about 15-20 minutes to complete. If you are still interested, please provide us with your phone number and the best time to contact you.
After you have contacted the participant, please remember to always mark their participation status across the continuum next to their name. Once the participant has e-mailed us back their phone number and the best time to contact them, mark it on the calendar and name the event as “Call [first name of the participant] – ResearchMatch.” In the description box, insert their phone number and make sure to color the event yellow before you’re done creating it. As soon as you have responded to the e-mail, immediately archive it. Keep the lab e-mail inbox as clean as possible so that it is easy to determine which e-mails need responses and which have already been covered; ideally, the inbox is always empty at the end of each day.
Recruitment: calling a potential participant
You will need to have access to the lab Google Voice account when calling a participant. For security purposes, contacting a participant using a Google Voice phone number ensures that any participant will not be able to see the number associated with your desk phone. First, you will need to login to the Google Voice account (you must be logged into the lab’s g-mail account first to access the Google Voice app) and dial the participant’s phone number using the keypad. You will then be prompted to select the desk phone number to which the call will be forwarded. Pick-up your desk phone when you hear it ring and proceed with the call.
Recruitment: conducting a phone screen
Now that you’re connected with the participant, you will need to ask them the screening questions to determine whether or not they are eligible to participate. Even if a participant is excluded based on their answer to a given question, make sure to ask all the questions in the screening script—this will prevent participants from guessing what the inclusion/exclusion criteria are for the study.
To access the screening questions, open the GUI and select “Screen New Participant.” Begin by entering the potential participant’s full name and phone number using the xxx-xxx-xxxx format for the phone number. Usually, the potential participant will be new, and so they will automatically be assigned the next available Screening ID. Occasionally, they will be a repeat participant. The GUI is designed so that it will scan its databases for repeat occurrences of the phone number that you enter; if it detects a match, you will be prompted to load that participant’s screen data from the last time they were contacted about study participation. This helps us to keep track of any potential participants who may be calling multiple times and providing different information each time.
Ask all potential participants all of the screening questions and enter their responses, even if they are a repeat-participant. If the participant meets study criteria, click on the study button and use the script to describe study procedures to the participant. If they are willing to participate after hearing more about the study, click on “Submit record and enroll participant in a study.” You will then be routed to the “Enroll New Participant” page where you will complete all of the required fields needed to set up their first appointment. Note that their name and phone number will be automatically filled in from their Screening data. Using the lab calendar to determine experimenter and testing room availability, select a time and date for the participant’s first session. Add the name of the experimenter(s) who are taking the lead on data collection into the Notes column, if known.
If a participant does not meet criteria for the study, or if they meet criteria but elect to not participate once they hear the study description, click on “Submit the record and do not enroll participant.” To assist you during the phone screen, all questions are accompanied by inclusion and exclusion criteria on the right-hand side of the prompt and will help you in determining the participant’s eligibility status as you go through the script. A notes section is also provided to further help you document any information that may be relevant or important to know about the participant (e.g. the participant was not cooperative during the phone screen). Do not be afraid to inform the participant that they do not qualify for a study if you suspect they are being untruthful or if they are being rude or hostile.
Once a participant has been successfully enrolled in a study and you’ve scheduled their first session, send them a follow-up email with important information for arriving to their first appointment:
“Hello ____________,
Thank you again for being interested in our research study! It was a pleasure speaking with you on the phone.
Here are the relevant details for your upcoming appointment:
Date: ___________
Time: ___________
Location: You will enter through the Goldblatt Pavilion entrance located at 860 E. 59th Street on the UChicago Medical Campus.
Recruitment: calling a potential participant who has previously participated in other studies
If a participant has signed a consent form indicating that they are interested in being re-contacted about future research studies, this will be noted in the subject information database. When re-contacting a participant who has previously participated in other studies, make a note stating the date of last contact in the “notes” column. This will avoid a situation wherein multiple research assistants accidentally attempt to recruit the same participant. If a participant from a previous study agrees to enroll in a new study, you do not need to conduct a new screen. Start with the “Enroll New Participant” button, enter their E-number (you will need to look this up from the Subject Information database), and schedule their first appointment for the new study.
Transportation:
For most studies, transportation costs will be covered. After telling the participant where the UC Medical Center is located, ask them if they would prefer (a) to drive themselves, in which case a parking voucher will be provided; (b) to use public transportation, in which case they will receive $10 to cover these costs; or (c) to have an Uber or Lyft car pick them up and drop them off.
If they select option (a) or (b), give them the building address and, if possible, e-mail them the campus map with the location of the parking garage and waiting room circled (a PDF version of the map is located inside the administrative folder in the Z-drive). If they select option (c), check the “Needs a cab” box on the appointment scheduler. On the day of the experiment, the lead research assistant should contact the participant no less than 2 hours before the appointment and confirm the address at which they would like to be picked up.
Sending appointment reminders:
Appointment reminders should always be sent one day before the subject is scheduled to participate. Using the subject information database. As soon as you have responded to the e-mail, immediately archive it.Keep the lab e-mail inbox as clean as possible so that it is easy to determine which e-mails need responses and which have already been covered; ideally, the inbox is always empty at the end of each day. , look up the preferred method of communication for the participant (phone, email, or text), and send a brief reminder to the participant about their scheduled appointment time, location, and planned method of transportation:
“Hello ________,
This is a reminder to confirm your scheduled appointment for tomorrow, [day of the week] the [day] of [month], at [time].
The address of the Goldblatt Pavillion building where the MAPS laboratory is located is 860 E. 59th Street, 60637. The main entrance is located at the “Comprehensive Cancer Center” wing and is down the street from Medical Campus Parking A.
[ I. If you are still planning on [driving yourself/using public transportation], we will provide you with [a voucher/$10] before your departure tomorrow. [driving] The address of the Medical Campus Parking A garage is 5840 S Maryland Ave, Chicago, IL 60637. Once you’ve arrived, a team member will meet you in the Goldblatt Pavillion lobby. [driving] See attached image of the University of Chicago campus map with the parking garage and the Goldblatt lobby circled in black. [public transportation] To help make your arrival as easy as possible, please refer to this link (https://www.uchicagomedicine.org/patients-visitors/patient-information/directions-and-maps/public-transportation) for specific details on nearby bus routes, elevated trains (The ‘L”) and commuter rails.]
[ II. If you are still planning on [taking a cab, Uber or Lyft], we will contact you tomorrow 1 hour before your appointment to confirm your pick-up destination. Once you’ve arrived, a team member will meet you in the Goldblatt Pavilion lobby. See attached image of the University of Chicago campus map with the Goldblatt Pavilion lobby circled in black. ]
[COVID-19] As an important reminder, you may either bring your own mask from home, or a disposable one will be provided for you on entry to the building. You will also be asked to use hand sanitizer and permit staff to take your temperature using a touch-less thermometer. If you have a fever, or if you are experiencing symptoms such as a cough, shortness of breath, fatigue, or body/headaches, we will ask you to reschedule your appointment for another day.
If possible, we also ask you to please bring a government issued ID to help us verify your identity upon arrival.
If you have any further questions or concerns, please do not hesitate to reach out to us before your session.
Finally, please send a response confirming that you’ve received this e-mail.
We’re excited for your participation in our study tomorrow!
Thank you!
The MAPS Lab Team
Phone: (773) 245 – 6887“
If communicating by phone, make sure to use the Google Voice phone number. If communicating by e-mail, make sure to use the lab email account. When you are done, open their appointment in the lab google calendar, and change “Reminder: N” to “Reminder: Y” so that all lab members are kept in the loop about which participants have been contacted and which have yet to receive reminders.
It is everyone’s responsibility to ensure that all participants receive reminders the day before their appointments. Undergraduate research assistants should check the calendar first thing every time they arrive at the lab and send reminders if it has not already been done. At the end of each day, lab coordinator and full-time study staff should check to make sure that reminders have been sent for the following day.
Experimental Procedures: Obtaining Informed Consent
Preparing for the First Session:
Before a subject begins their study participation, first check to see whether the subject is a repeat research participant. If so, it is possible that some of the study measures have already been completed as part of their participation in another experiment. If so, those study measures may not need to be re-administered. In general, cognitive assessments and the SCID are valid for 1 year. All other symptom ratings (e.g. the BPRS) are only valid for 1 week, so we will almost never be able to reuse those across studies. To determine whether a previously administered assessment is still valid, open the relevant folder on the Z-drive and check the date of the most recent assessment. If it is within the window of validity (e.g., 1 year for SCIDs, 1 week for BPRS), it does not have to be re-administered in the present study.
After you determine which measures will need to be administered to the participant, you must create their personal folder on the Box account and fill it with blank versions of all the forms that will need to be filled out. To prepare a subject’s study folder:
- First unplug the iPad from the docking station (top shelf in main cabinet).Turn on the iPad and keyboard; if keyboard does not automatically sync to the iPad, press the “sync” button on the keyboard. This could take a few minutes to sync, so do this step first.
- On the iPad, navigate to the Box Application → MAPS Lab folder. From there, navigate to the relevant study folder and open the “Use These Forms” folder. Here you will see the “Control” and “Patient” folders; click on the “…” of the folder that is appropriate for the participant you will be running. Note that the “Use These Forms” folder should always have the most up-to-date forms, including stamped documents that have not expired. Although it will be the lab coordinator’s responsibility to make sure that these forms are up to date, it will be each experimenter’s responsibility to ensure that they are not collecting data on forms with expired stamps. Doing so is a protocol violation that will need to be filed with the IRB. If you discover that you have collected data on expired forms, contact Dr. Erickson as soon as the mistake is discovered so that it can be rectified quickly.
- Click “Move or Copy” and navigate to the “Restricted” folder within the relevant study folder. Make sure to click “Copy Here” (NOT “Move Here”).
Navigate back to the same “Restricted” folder after copying has been complete. Click on the “…” symbol alongside the folder you just copied, then click “Rename this Folder” to rename it with the related participant’s E-number.
Informed Consent Document:
Before beginning any new study, make sure to read through the informed consent document thoroughly to familiarize yourself with the information. To further help you organize yourself, keep a paper copy of the consent form that you can take notes on to facilitate a more fluid overview of the information. In the effort to save paper, all consent forms will be handled by the participant electronically on the iPad. Therefore, it’s important to make sure that the iPad is sufficiently charged before obtaining consent to avoid any disruptions during the session. In the case that the participant requests to take a hard copy of the document home, also make sure that the consent form pile is sufficiently stocked up before beginning.
For each participant, regardless of whether or not they are a patient or a control subject, give a brief verbal overview of the document, including:
- A brief overview of what will happen during the experiment, and of the EEG setup procedures (if applicable).
- A summary of the risks to participation in the experiment (even if the risks are minor, such as boredom or fatigue).
- A reminder that the participant can request to take a break or discontinue the experiment if s/he feels uncomfortable or otherwise no longer wishes to participate.
- For patient participants, let them know that their medication will not be affected by their participation in the study.
Before conducting the verbal overview, demonstrate to the participant how to simply swipe up or down on the iPad as they navigate through the document. Make sure to notify the participant when to swipe up when you move along to the next page and indicate to them which section you’re on. If you feel that the participant seems lost or confused on how to handle the iPad, don’t be afraid to guide them through the motions and physically do the swiping for them. After your verbal overview, allow the participant a few minutes to read through the consent document and ask any questions they have about study participation. In addition, make sure to offer the participant a hard copy of the consent form to take home with them if they’d like (all paper copies will be stored in the first drawer of the desk in each testing room).
To open a consent form in the Box application:
- Locate the participant’s folder within the related study folder and click on the document named “Consent Form (Patient),” or if you’re running a control subject, “Consent Form (Control).”
- Click on the bottom left icon (looks like a square with an arrow pointing up) and click the Acrobat application that says, “Open in Acrobat”.After the participant has had the chance to look over the consent form and/or all of their questions have been answered:
- Ask the participant for their verbal agreement to participate in the study if they have not yet indicated so.
- If the participant agrees to continue on with the study, click the icon in the bottom right corner (it’s a blue circle with a pencil in the middle; if you do not see the icon, tap the page). Select “Fill and Sign”, then click on the banner at the top of the page that was just prompted. Select “Create Signature” and have the participant sign their name. Deselect “Save to Online Profile” so their signature will not be saved in the system. Click “Done” in the top right corner and tap where you would like the signature to go on the page.
- Repeat step 4 with your own signature to fill in the “Statement of Person Who Obtained Consent” fields.
Conducting a fluid informed consent process is a skill that requires practice and familiarity with the research protocol. You must be able to demonstrate to the lab coordinator that you can succinctly summarize the information in bullet points above, as well as answer common questions about the research study before you will be “signed off” to conduct consent procedures independently.
NOTE: Make sure that the informed consent document is current! Use of expired informed consent documents (or any forms, for that matter) is a violation of IRB protocol and will need to be documented as a protocol deviation.
Experimental Procedures: Collecting data
Self-report and/or interview assessments:
Instead of paper forms, participants will complete electronic forms on iPads. There are several steps to setting up iPad data collection:
- To open the intended documents, first click on the form you want to use inside of the participant’s study folder. Click on the bottom left icon (looks like a square with an arrow pointing up) and click the Acrobat application that says, “Open in Acrobat.”
- Before starting the assessment with the participant, fill out the administrative fields (Subject ID, Date, etc.). Only use the participant’s assigned E-number, NEVER their name. The only place that their name should appear is in their signature on the consent documents. All other documents in the lab should refer to the participant by their E-number.
- Complete the assessment with the participant. If it is an interview-based measure, ask them the questions and fill out the requisite fields. If it is a self-report measure, lay the iPad flat and give them a stylus to use to select their responses. As a healthy habit, please make sure to double-check that all edits were indeed saved in the intended Box folder after exiting Acrobat.
- After making sure that all questions and signatures have been filled out and you are ready to move on to the next document, swipe up from the bottom of the iPad to exit out of Acrobat and close the current document. This will automatically save any edits to the folder in the Box application.
Navigate back to the Box application and click on the next document you need. Repeat steps 5-8 until complete.
Symptom Rating Assessments – Full-Time RAs Only
The quality of a clinical assessment depends upon a number of factors, including the interviewer’s skill level, the rapport developed between the interviewer and patient, the severity of the patient’s symptoms, and their personality type. The length and effectiveness of the clinical interview will be determined in large part by a combination of these factors. In order to conduct a fluid and successful assessment, it’s crucial to understand how to navigate through a structured interview while taking into account your unique interaction with the participant. For example, a patient with schizophrenia and disorganized speech will be more challenging to interview than a patient with bipolar disorder who is not currently experiencing a manic or depressive episode. Although both participants will receive the same set of assessments, each session may require a unique approach to the interview. Extensive training and practice with diverse cases will not only solidify your knowledge of diagnostic criteria and symptom measurement but will help you develop your own flexible style as an interviewer.
In general, an interview will typically last 1.5 hours to 2.5 hours, but it’s not uncommon for the process to take up to 2 sessions, 2 hours each. As such, the first study session(s) is solely dedicated to clinical assessments. Although it can vary case by case, your experience with a participant is far easier and more pleasant after developing a good rapport. In order to develop rapport, it’s crucial to consistently remain patient, self-contained, confident and sympathetic throughout an interview. In the case that a participant makes you feel uncomfortable, overwhelmed or unsafe, Dr. Erickson or another experienced RA will always be available to assist you.
In addition to administering your measures, you will have to create a write-up for any participant that has met diagnostic criteria and present their case at our weekly Diagnostic Consensus Meetings (DCM). As a group, we will discuss your participant’s symptom ratings and confirm or re-evaluate your diagnostic decisions. Detailed training on DCM write-ups will also be a part of your symptom ratings training.
Computerized tasks:
After assessment data has been collected, it is time to administer the computerized tasks. For some studies, these tasks will just involve participant making button-press responses. For other studies, these tasks will involve an EEG set up beforehand.
While running the participant through the task, it is very important that you present the task instructions in a standardized way. Each experiment will have a sequence of instructional/demonstration screens that you will read out loud to the participant. Then, there will be a small number of practice trials. Make sure to stand in the room with the participant to make sure that they understand the task and provide corrective feedback if necessary. At the end of the practice, you will be prompted to decide whether or not to repeat the practice. This will be a judgment call; if the participant seems to understand the task, then you can advance to the experiment. If you believe that the participant should repeat the practice, please do this as many times as it takes for the participant to understand the task requirements.
During the experiment itself, it is important to keep participants awake and engaged with the task. Use the break screens to encourage participants, chat with them about their experience, let them know you appreciate them doing their best, etc. The happier the participant is about doing these (admittedly boring) tasks, the higher the data quality.
As with the informed consent procedures, administering assessments and conducting computerized tasks fluidly takes practice. You must be able to demonstrate to the lab coordinator that you can perform these steps independently before you will be “signed off” to conduct these procedures with participants.
Experimental Procedures: Finishing a Session
After the participant is finished with the experimental session, there are a few things to take care of. Please make sure to do all of these things after each session!
Wrapping up with the participant
Paying the participant:
Locate the petty cash receipt in the lock box and complete all the blank fields as necessary, making sure to write down all of the information yourself (i.e., do not allow participant to fill out address and social security number). Indicate how much money they have earned; pay rate is $15 per hour, rounded to the nearest half-hour and up to the nearest dollar. So, one hour = $15, and 1.5 hours = $23 ($15 + $7.50 rounded up = $23), etc. Although most studies use this $15 per hour pay scale, occasionally studies use a different pay scale. Refer to the “Study Account Info” document in the Erickson Lab → 05_Administratve → SOPs folder for study-specific pay scales.” In the case that we provide a participant with transportation, separately indicate how much money they will be recompensated. Please note that we only cover up to $50.00 each way ($100.00 maximum coverage for transportation costs both ways) and the participant will be responsible for any additional expenses. After the participant has signed his/her name, give them the appropriate amount of cash from the envelope. Return the filled-out receipt back into the lock box.
After the participant has left, you will have to record the petty cash transaction on the petty cash log excel spreadsheet located on the Z-drive (05_Administrative → Finance). Note that the petty cash log is password protected with the lab’s general password. Indicated below is a sample of what logging an expense will look like using the exact spreadsheet
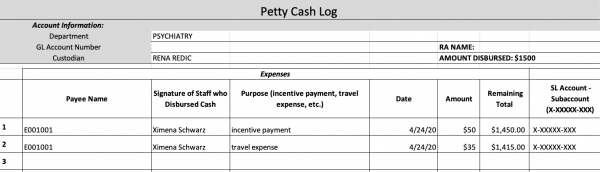
As depicted in the above sample, two entries were recorded for participant E001001 with two different expenses. If a participant is also reimbursed for any transportation costs, it’s important to separately indicate this expense under the incentive payment that all participants receive after a session. Otherwise, the incentive payment should be recorded as a single entry. In the “Remaining Total” column, notice that for each entry, the total balance decreases depending on the sum of the current expense amount subtracted from the last recorded remaining total amount (the last entry amount of $1,450.00 – the cab fare expense of $35.00 = the current available remaining amount of $1,415.00). Your job for each entry is to make this exact calculation to indicate how much money is currently available in the account being charged for participant expenses. It’s also important to know what the remaining total balance is in order to disburse more money into an account that’s running low on funds. Next to the remaining total is the “SI Account – Subaccount” column. Please refer to the “Study Account Info” document in the SOP’s folder to locate the related account numbers for each study.
Scheduling next appointment:
Most of the studies include multiple testing sessions for each participant. At the end of each session, schedule the next one before the participant leaves. Open up the lab calendar and the screening/scheduling GUI tool. Click on the “Schedule Next Session” button and fill out all information after you decide on the next appointment time and date, depending upon experimenter and participant availability. After finalizing their appointment date, time, and mode of transportation, let the participant know that they will be receiving a reminder one day before their scheduled appointment.
Transfer to next study:
If the participant has completed all components of a given study and qualifies for participation in another study, let them know about other opportunities for research participation. If they are interested, you can schedule them for the next study at the end of their last appointment.
Wrapping up after the participant has left
Upload data to response forms and delete data from iPad:
After the participant has left, you will need to upload their self-report and interview data that you gathered during their experimental session into their indicated folders on the Z-drive:
- First, password protect the participant’s consent form with the lab’s general password and save the file as “[year]_[month]_[day]_[initials].pdf” (if John Smith did the CNTRACS study on May 23rd 2020, his consent form would be saved as 2020_05_23_JS.pdf.).
- Navigate to the Z-drive and locate the “Consent” folder to upload the consent form.
- Next, locate the relevant study folder. Inside, there are two separate sub-folders: (a) behavioral data, and (b) self-report and interview data.
- Create an individual subject folder inside the self-report and interview data folder and move over all of the participant’s assessments from the iPad into their folder.
- Finally, go back into the iPad and delete the participant’s consent form and all of their assessments.
- NOTE: Before deleting anything on the iPad, please double-check that all uploaded documents properly saved on the Z-drive.
If when obtaining the participant’s consent, you noticed that the consent form pile was running low, please make sure to notify Laura or one of the RA’s to print out more hard copies.
Updating a participant’s record:
To keep a record of which tasks a participant has completed in a study protocol, you will need to use the screening/scheduling GUI to update the participant’s task list record after every testing session. First click on the “Update Participant Record” button in the GUI, then select the (a) study and (b) participant that needs to be updated. Fill out all fields on the left column, making sure to change the participant’s status from “Scheduled” to “Active” once s/he has completed at least one session.
The right-hand column will include a list of all of the study tasks and assessments. Indicate the date that those tasks and assessments were completed. Occasionally, one or more of the study tasks and assessments will have been completed as part of another study. For example, a participant does not need to complete a SCID more than once each year; if s/he completed a SCID six months ago as part of another study, we will not re-do the SCID for the present study; rather, we will use the text field to the right of the date field to indicate the study that the SCID was drawn from. Most of the time, all assessments will be unique to that study, so the study name is auto-filled in those text boxes for ease of record-keeping.
Finally, enter any notes specific to the study in the notes field. For example, perhaps the participant was temporarily lost to follow up for a couple months, but eventually completed all study procedures; you would write in the notes field that there was an abnormally long delay between testing sessions. Any notes that are specific to a subject should go into the notes field in the subject information database (e.g., the participant frequently no-shows his/her appointments).
When the participant is no longer active in a study, either because they have completed all study procedures, have been lost to follow-up, have involuntarily withdrawn, etc., make sure to change their study status to reflect this change. This will “close” the participant, and their number will no longer appear in the dropdown menu for record updating.
Adding a tack-on task:
Occasionally, short experiments that are adequately covered by a larger study’s IRB protocol will get “tacked on” to the end of a study session. If a participant is able to complete one of these tack-on tasks at the end of an experimental session, make sure to document this by clicking the “Tack On Task” button in the GUI. From there, you first select the participant’s E-number, then the study they were originally enrolled in (the IRB number will auto-populate, but check to make sure it’s correct), then select the tack-on task they completed. As with the Update Record panel, complete all fields. Most of the data should auto-populate from the original data record. Make sure to state clearly which assessments and tasks were “grandfathered in” from the original study, and which assessments and tasks were unique to the tack-on experiment using the text field in the right-hand column.
Clean up after yourself!
With so many people using such a small lab space, it’s important to make sure to clean up thoroughly after each experiment:
- If you used the EEG system, make sure all the backs of stickers are thrown away, the electrodes washed, needle/syringes properly disposed of, the top of the cart is clear from clutter, and the battery is charging.
- Log out of all computers
- Put away money/vouchers in lock box
- Take all of your belongings with you
- Avoid leaving any scratch paper and pens out
- Use a Lysol wipe to scrub any electrode gel off of surfaces, and use the stick vacuum cleaner to get dried electrode gel off of the floor
- Tidy up the bathroom; check to make sure there are no smudges on the mirror or hair in the sink. Make sure the supply tower in the bathroom is well-stocked.
- IMPORTANT COVID-19: It’s crucial to thoroughly wipe down ANY surface that you and the participant were exposed to with Lysol wipes. These surfaces can include chairs, door handles, bathroom sink, toiletries, key board, mouse pad, etc. You must properly wear your mask during the entire time you are disinfecting the exposed lab space.
Also, if you used the last of any supplies (or noticed that we’re running low on some supplies), please leave a note for Laura so that she can order more.
NOTE: Every other month, there’s a scheduled run-through of the lab’s study supplies list. RA’s are responsible for completing the supply checklist on the scheduled day and for alerting the lab coordinator if an item needs to be replenished. Please refer to the “Bi-Monthly Supply and Maintenance Checklist” document on the Z-drive for specific instructions (Administrative → SOP’s).
